The Art of Muzzleloader Shooting
|
|
.451 Cal Muzzleloader Rifle
Muzzleloaders have always fascinated me, firstly because I take a general interest in history
of technology, and secondly because I admire the gunsmiths of old for their inventiveness and
superb craftsmanship, considering the materials and tools they had at their disposal.
I practice target shooting with muzzleloaders at our local sport shooting club. Although I shoot
modern guns as well, I particularly like the old-fashioned ones. In our indoor shooting range,
we shoot percussion pistols, flintlock pistols, and cap-and-ball revolvers over a distance
of 25 m and rifles over a distance of 50 m. The most common black-powder calibers used for
target shooting are .36/.38 and .44/.45.
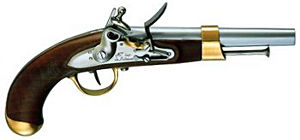
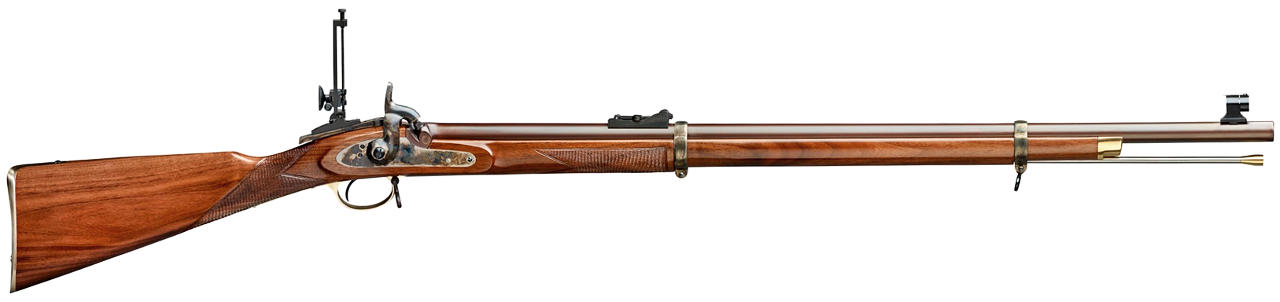
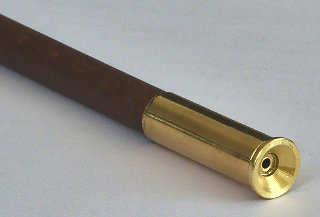
The above photo shows one of my muzzleloader rifles. This one is a replica of the British 1860
Volunteer Rifle, one of the military rifles introduced during the last years of the muzzleloader
era. It is equipped with a tunnel front sight and an adjustable tang sight for long-range shooting.
The following photos display three of my black-powder target pistols. They are fully functional
replicas of percussion pistols from the first half of the nineteenth century. Only the calibers
have been changed to those in use today.
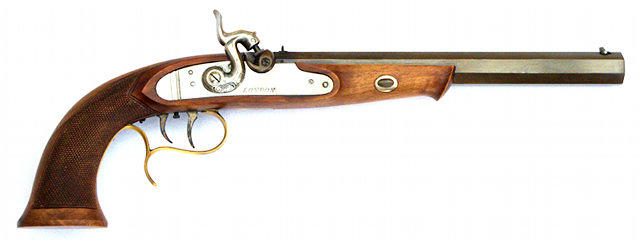
The first one is a typical British-style sporting pistol. The flat-bottomed grip is
characteristic for pistols made by gunsmith William Parker of London. The pistol has
a match-grade barrel with fixed sights, and it shoots very well.
|
.45 Cal Percussion Pistol "London"
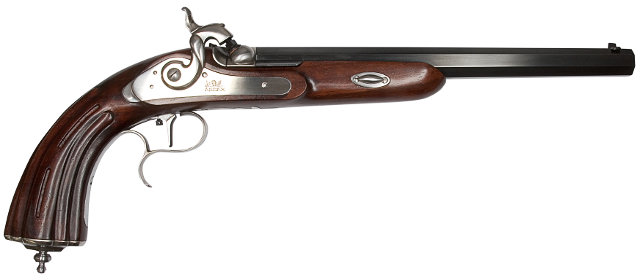
The next one is based upon a French sporting pistol ("Le Page à Moutier"). This gun is a beauty. The quality of material and workmanship is superb (polished, laser-inspected barrel bore). The pistol is well-balanced and a pleasure to shoot.
|
.44 Cal Percussion Pistol "Le Page à Moutier"
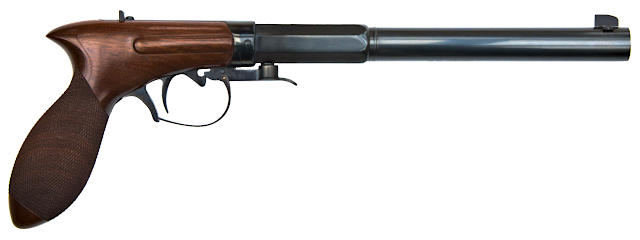
The third one is a so-called underhammer pistol. The extremely simple ignition system of these guns is located under the barrel. The trigger guard works as the main spring pushing the hammer upward as soon as the trigger is pulled. Underhammer pistols are very popular among target shooters. During the Wild West era, compact underhammer pistols were known as "boot pistols" because they were often carried concealed inside a boot leg.
|
.36 Cal Cook Underhammer Target Pistol*
* The Cook pistol has become one of my favorites for target shooting. Trigger and rear sight are adjustable. The gun shows excellent precision, and it is well-balanced and comfortable to shoot. Further, it is more economical than big-bore pistols because it needs much less powder and lead due to its small caliber.
For the sake of completeness, it should not go unmentioned that during the flintlock and caplock
era, there were also screw-barrel pistols, for example the Queen Anne pistol (flintlock) and the
Liegi Derringer (caplock). These were
actually early forms of the breechloader.
Muzzleloaders used for target shooting or hunting require a meticulous loading procedure
which comprises more than just stuffing powder and ball into a barrel. Gunsmiths and marksmen
of the muzzleloader era (ending around 1870) were resourceful people, and they achieved a
precision comparable to modern guns.
Particularly beginners among muzzleloader shooters make many mistakes and may get
frustrated soon because they experience difficulties or they do not achieve the
precision they hoped for. Therefore, I am going to describe the technology and
handling of muzzleloaders in some detail. My main focus is on target shooting
with percussion pistols and round balls. The handling of rifles is principally
the same (apart from the fact that they are fired from the shoulder). The information
given here is a compilation of knowledge published elsewhere, the advice of experienced
fellow shooters, and results obtained by own experiments.
Before going into detail, a short warning: muzzleloaders are as deadly as modern guns!
A .440 cal round ball fired from a percussion pistol has a typical muzzle velocity of
250 m/s (approx. 820 fps), depending on the powder charge. This translates into a muzzle
energy of 259 J (191 fpe) and comes close to a modern .380 ACP or .38 Special projectile.
A .535 cal round ball with the same muzzle velocity has a muzzle energy of 466 J (343 fpe)
which is not far from a .45 ACP bullet. A .45 cal black powder rifle firing a round ball with
a light powder charge typically used for target shooting yields about the same muzzle energy
as a modern .357 Magnum revolver. A rifle of the same caliber firing a long projectile
in combination with a heavy black powder charge is able to deliver muzzle energies beyond
2000 fpe which surpasses a modern .30-30 Winchester rifle. In general, bullets fired from
muzzleloaders have relatively low velocities, which is often compensated for by large
calibers. The fact that muzzleloaders have been (and still are) used for big-game
hunting speaks for itself. Handle your muzzleloader with the same care as you would any
other firearm!
General design and ignition systems:
The rear end of a muzzleloader barrel is internally threaded and plugged by a roughly
caliber-sized screw, the breech plug. To ignite the powder charge which is located in
front of the breech plug, the gun is fitted with a narrow channel drilled through the
sidewall of the barrel at the front end of the breech plug (traditional design). There
is also a modern design (inline muzzleloader) where the ignition channel is drilled
longitudinally through the breech plug. During the history of muzzleloaders, gunsmiths
developed several devices to ignite the powder charge through the ignition channel (in
chronological order):
• Fuse
• Matchlock
• Wheellock
• Flintlock (including the snaphance and similar early forms)
• Caplock (percussion lock)
Ignition by a fuse inserted into the ignition channel, sometimes still found with salute
cannons, is not practical for target shooting or hunting. The vast majority of black powder
shooters of today use guns equipped with caplocks or
flintlocks
although guns with wheellocks and matchlocks are found occasionally. Matchlock, wheellock,
and flintlock share a common feature, the flash pan. The latter is a small metal pan attached
to the lock plate and touching the side of the barrel slightly below the opening of the
ignition channel which is called "vent" or "touch hole" in this case.
The flash pan contains a small quantity of fine-grained black powder (priming powder) which
is either ignited by a burning slow match which gets pushed into the pan when pulling the
trigger (matchlock) or by a shower of hot sparks generated by a friction mechanism (wheellock,
snaphance, flintlock) at the instant of firing the gun. The fireball of the deflagrating
priming powder ignites the main charge through the touch hole.
The caplock does not have a flash pan. Here, the ignition channel terminates in a replaceable
screw nipple on the outside of the barrel. The nipple itself has a narrow channel drilled
through it which serves as an extension of the ignition channel. The nipple holds a percussion
cap, a small copper cap containing an impact-sensitive explosive. At the instant of firing, a
hammer strikes the percussion cap and ignites the explosive which sends a jet of flame down
the ignition channel and into the powder charge.
Lock design:
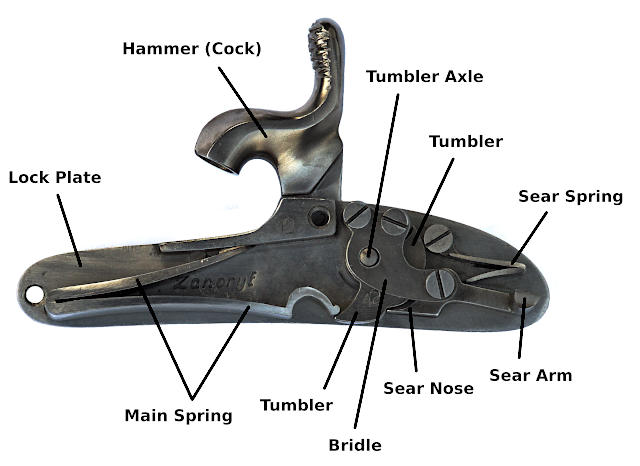
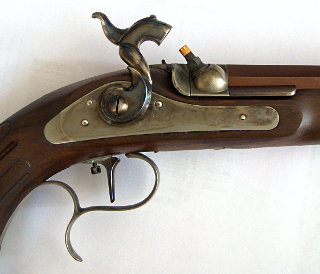
The following photos show the internal parts of a typical caplock (side lock in this case) in
decocked, half-cock, and full-cock position. The internal parts of a flintlock
are basically the same.
|
Caplock, Decocked
|
|
|
|
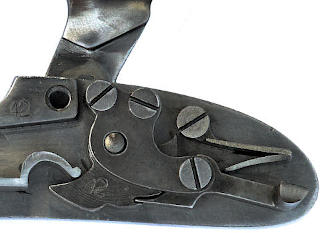
Half-Cock |
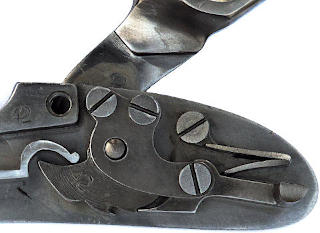
Full-Cock |
This is how the caplock works: when we cock the hammer, the tumbler rotates backwards against the
tension of the main spring until we hear a first click which is caused by the sear nose snapping
into a deep notch in the surface of the tumbler. This is the half-cock (safety) position. The
mechanism is now locked and the gun cannot go off by pulling the trigger. If we pull the hammer back
further, the sear nose will slip out of the notch and soon after, we will hear a second click caused
by the sear nose snapping into a small step in the tumbler surface. Now, the lock is in the full-cock
position, the gun is ready to fire, and as soon as we pull the trigger (not shown), the sear arm,
hitherto depressed by the sear spring, is raised which causes the nose to move downward and disengage
from the step in the tumbler. Now tumbler and hammer, driven by the main spring, rotate rapidly forward
until the hammer hits the percussion cap which ignites the powder charge. A caplock generally needs
little maintenance. In addition to cleaning the outside after each shooting, the moving parts should
be checked for dirt and oiled from time to time. On some locks, the bridle screws tend to come loose
after a while and might need occasional retightening.
The design of the above lock, belonging to a military pistol (Lorenz Pistol), is rugged and simple.
Sporting pistols and rifles often have a more sophisticated design with additional internal parts, such
as stirrup and fly. The former is a linkage between mainspring and tumbler (reducing friction), the
latter is a tiny steel part preventing the sear nose from being caught in the notch of the tumbler when
firing the gun.
Projectiles:
The classical muzzleloader projectile is the round ball cast from pure lead. Later came
non-spherical, elongated projectiles featuring a cylindrical body (with circumferential
grooves holding a lubricant), a flat or hollow base, and a round or conical tip
("conicals"). These were developed because the round ball, although efficient and
precise at short or medium distance, loses speed rapidly during its flight and shows poor
long-range performance. The reason for this is the relatively low mass of a round ball for
a given caliber. An elongated projectile of the same caliber shows a similar air drag but
is heavier, has therefore a higher inertia, and is not decelerated by air drag to the same
extent as a round ball. Therefore, such a projectile retains a higher percentage of its
initial kinetic energy (muzzle energy) over a given distance than a round ball. The elongated
projectile (Minié ball) was more or less the standard ammunition for rifled muskets
during the American Civil War (1861-1865).
Muzzleloader barrels:
Most target pistols with caplocks have rifled barrels and shoot patched round balls
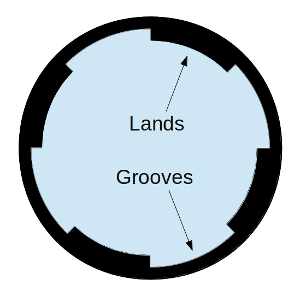
(see further below). Rifled barrels have helical grooves with a depth of approx.
0.1-0.4 mm cut or forged into their bore. The unaffected, elevated areas of the
bore remaining between the grooves are called lands. The soft lead projectile
(or ball/patch combination) engages the rifling.* Thus, when the gun is
fired, the projectile is forced to rotate about its longitudinal axis on its way
through the barrel bore. After leaving the barrel, the projectile continues to rotate
due to its moment of inertia. The fast rotation prevents the longitudinal axis of the
projectile from changing its spatial orientation and thus results in a more stable
trajectory (gyroscopic stabilization). Smoothbores (pistols, muskets) firing round
balls are inherently less accurate than guns with rifled barrels but are still
usable at relatively short distances. Non-spherical projectiles (Minié balls,
etc.) definitely require rifled barrels. Fired from a smoothbore, such a projectile
would start yawing or tumbling shortly after exiting the muzzle, and the resulting
trajectory would be unpredictable. This is mainly due to gas forces acting on the
projectile immediately after leaving the barrel (powder gases escaping from the
muzzle) and during its free flight (air drag). The projectile may even strike with
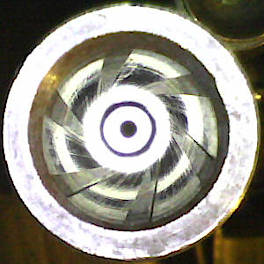
its broad side. Most rifled muzzleloader barrels have 3-12 grooves. Technically, the
rifling of a barrel is an internal screw thread with a very large pitch and multiple
starts. A schematic cross-section and a photo of a rifled barrel are shown below.
*The projectile has to undergo a controlled plastic deformation along its circumference so as to interlock with the rifling of the barrel. To facilitate this, muzzleloader projectiles are usually cast from pure lead or a soft lead alloy. Depending on its design, the shaping of the projectile either happens during the loading process or at the instant of firing the gun. Putting aside the round ball (see farther below), there are two main categories of non-spherical projectiles, those matching the groove diameter of the barrel and those matching the bore diameter. In the first case, the projectile gets swaged into the rifling as it is pushed down the bore. In addition to their original purpose, the lubrication grooves (cannelures) in the lateral surface of the projectile reduce the contact area and thus ease the shaping process since the elevated parts (bands) are subjected to a higher local pressure during loading. The R.E.A.L bullet (R.E.A.L. = Rifling Engraved At Loading) is a typical example of such a projectile. In the second case there is no deformation during the loading process since the sub-caliber projectile slides over the lands of the barrel. Thus, much less force is required for loading the gun. These projectiles are designed to expand radially when exposed to the rapidly rising pressure of the powder gases at the instant of firing and thus engage the rifling and ensure a sufficient gas seal. The high gas pressure mainly results from the inertia of the projectile which counteracts a rapid expansion of the powder gases. One example of a sub-caliber projectile is the compression type bullet (Lorenz bullet). This projectile has very deep lubrication grooves which make it look like a stack of flat truncated cones. As soon as its flat base gets hit by the powder gases, the projectile gets compressed along its longitudinal axis. The axial compression, assisted by the special geometry, forces the bullet to expand in radial direction and fill the grooves of the barrel. Another example is the expansion type bullet (Minié ball) which has a cavity at its base. As soon as the pressurized powder gases enter this cavity, the rear part of the soft projectile inflates until it engages the rifling and seals the bore. There were even rifles with polygonal barrels made during the muzzleloader era. The most famous example is the Whitworth Rifle, designed in the 1850s, which fired bullets with a hexagonal cross-section. Nowadays, there are even sub-caliber projectiles with plastic sabots on the market. This, however, is not what I would call traditional muzzleloader shooting.
|
|
|
|
Cross Section of Rifled Barrel with 4 Grooves |
Photo of Rifled Barrel with 6 Grooves |
The caliber of a barrel is usually measured in millimeters or in inches (1 in = 25.4 mm).* Two diameters, bore diameter (land diameter) and groove diameter, characterize a rifled barrel. The groove diameter is the sum of the bore diameter and twice the groove depth. Unfortunately, the nominal caliber stamped on a barrel is often not exactly identical with either of both diameters. Therefore, we have to rely on the gunmaker's recommendation or on our own experiments when choosing the projectile with the optimum size.
*There is further the old gauge system which characterizes the caliber of a barrel by the number of bore-sized round balls which can be cast from one pound (0.4536 kg) of pure lead. Accordingly, the weight of a round ball for an n-gauge gun is the nth fraction of a pound. A round ball for a 12-gauge gun, for example, weighs 1/12 pound (approx. 583 grains). Historically used for both smoothbores and rifles, the system still finds application for shotguns.
Another important characteristic of a rifled barrel is the twist rate. The
latter is defined as the number of revolutions the projectile performs about the
barrel axis as it travels a certain distance. Thus, the twist rate is comparable
to the lead of a screw thread. The twist rate is usually measured in revolutions
per inch. A twist rate of 1 in 48" or 1:48", for example, means that
the ball will complete one revolution as it travels a distance of 48 inches or
one forty-eighth of a revolution as it travels 1 inch. The greater the number of
revolutions per inch, the faster the projectile will rotate at a given muzzle
velocity ("fast twist"). Accordingly, a small number of revolutions per inch
translates into a lower rotation speed ("slow twist").
According to the above definition, the relationship between muzzle velocity, twist
rate of the barrel, and rotation speed of a projectile upon exiting the muzzle
is described by the following equation:
rotation speed [s-1] = muzzle velocity [in/s] * twist rate [in-1]
According to this formula, a ball exiting a rifled barrel with a twist rate of 1:48"
(= 1/48") with a muzzle velocity of 1000 feet per second (= 12000 inches per second)
has a rotation speed of 250 revolutions per second (= 15000 rpm).
The speed of rotation required to stabilize a projectile in its flight depends
on its shape. Due to their high degree of symmetry, round balls do not have to
rotate very fast and thus a barrel with a slow twist is sufficient to achieve
the desired precision. Barrels particularly designed to fire round balls usually
have twist rates greater than 1:50" (up to approx. 1:100"). In
contrast to a round ball, a non-spherical projectile needs a higher speed of
rotation to achieve a stable and reproducible trajectory. When fired from a
barrel with a slow twist, such a projectile will start tumbling gradually
during its flight. As a result, the long-range precision will be unsatisfactory.
Small-caliber projectiles with a high aspect ratio (length of projectile divided
by caliber) require the highest speed of rotation and, accordingly, the fastest twist.
Most muzzleloader barrels designed for non-spherical projectiles have twist rates
between 1:15" and 1:50". A twist rate of 1:48" is often found with
replicas of black powder rifles supplied by the industry. This "universal" twist
rate is considered suitable for both round balls and non-spherical projectiles
with a moderate aspect ratio. Long projectiles definitely require a faster twist.
Since the speed of rotation varies in proportion with the velocity of the projectile,
particularly long projectiles should not be fired with very light powder charges.
Handgun barrels tend to have a faster twist (mostly between 1:15" and
1:60") than barrels of long rifles in order to achieve the required speed
of rotation in spite of the lower muzzle velocity.
Black powder:
First of all, historic muzzleloaders and their replicas are meant to be loaded
with black powder or approved substitutes (Pyrodex, etc.). For this reason,
"Black Powder Only" is usually stamped on the barrels of muzzleloader
replicas. Of course, this stamp is not found on original guns manufactured before
the advent of smokeless powder. Unless expressively stated otherwise, a muzzleloader
barrel is NOT designed to handle the much higher peak pressure developed by smokeless
powder. Using the latter (even small quantities) in a muzzleloader may therefore
result in a barrel burst with potentially disastrous consequences.*
*Further, do not use powder recovered from firecrackers or other pyrotechnic articles. What looks like black powder may actually be something else. Some pyrotechnic compositions, for example flash powder, detonate under confinement and would destroy any gun barrel. Besides, black powder contained in crackers is often of inferior quality and not suitable for sport shooting or hunting.
Black powder is a granulated mixture of approx. 75% potassium nitrate (oxidizer),
15% charcoal (fuel), and 10% sulfur (fuel). It is a hazardous material and should
be handled with GREAT care. In contrast to smokeless powder, which burns
comparatively slowly in the open air, industrially made black powder burns very
rapidly, making a dull thudding sound. Even without containment, a pile of black
powder may explode upon ignition when its mass exceeds about 1 kg (self-confinement).
Moreover, black powder is particularly dangerous because it is easily ignited by
sparks (otherwise, a flintlock wouldn't work). As a precaution, never pour black
powder down the barrel of your gun directly from a powder flask. This might result
in the explosion of the latter if there is still a smoldering spark from a
preceding shot in the barrel. Only use pre-measured powder charges stored in sealed
tubes (plastic, glass, or metal) to load your gun.
Quality and quantity of the powder charge depend on barrel length and caliber of
the gun (pistol, rifle, smoothbore musket, shotgun). Short barrels require a
fast-burning powder. Otherwise, the ball will leave the barrel before the powder
can build up the maximum gas pressure. A slow-burning powder in a handgun will
produce an impressive muzzle flash, but it will not accelerate the projectile to
the desired muzzle velocity because a substantial part of the combustion happens
outside the barrel.* In rifles, muskets, and shotguns, the powder has more
time to develop the maximum gas pressure due to the greater barrel length. Here, a
powder with a slower burning rate may be the better choice. Using a heavy charge
of fast-burning pistol powder in a long gun may result in a premature and much
higher pressure peak which puts unnecessary stress on the barrel. Excessive
acceleration of a projectile in a rifled barrel will further lead to a higher than
normal torque acting on the projectile since the latter is not only subject to
linear acceleration but also to a proportion of angular acceleration. This might
cause the projectile to disengage from the rifling which results in lower
precision. Apart from the caliber, the weight of the projectile (= inertia) has to
be considered when choosing the suitable powder grade for a rifle or musket. For
example, a .50 caliber rifle may very well tolerate a moderate charge of pistol
powder in combination with a round ball whereas a much heavier long projectile of
the same caliber most certainly requires rifle powder. In any case, one should
begin with smaller charges when experimenting with pistol powder in long guns.
*Depending on powder quantity and burning rate, a small portion of the powder charge is even blown out of the barrel unburned and can be found on the ground a few yards downrange. I once swept the floor of an indoor shooting range after an evening of practice. The sweepings looked suspiciously like a mixture of smokeless and black powder. Out of curiosity, I took a sample outside and lit it with a match. It ignited immediately and burned almost as fast as fresh black powder. Such hazardous waste does not belong in a dust bin! It can be safely disposed of by flushing it down a sink or toilet.
The following table shows the most common types of black powder (European manufacturers) used for target shooting and hunting, their respective particle size range, and their main application. The burning rate is approximately proportional to the specific surface area of the powder grains (measured in square meters per gram) and thus decreases with increasing grain size of the powder.
| Powder Grade | Grain Size Range [mm]* | Recommended Usage |
| Swiss Powder #1 | 0.25 - 0.50 | Small-Caliber (≤ .32) Handguns, Priming Powder (Flintlocks) |
| Swiss Powder #2 | 0.50 - 0.80 | Rifles, Handguns |
| FFFFG (4FG) | 0.15 - 0.425 | Priming Powder (Flintlocks), Small-Caliber (≤ .32) Handguns |
| FFFG (3FG) | 0.30 - 0.85 | Handguns, Small- or Medium-Caliber Rifles |
| FFG (2FG) | 0.60 - 1.18 | Large-Caliber Rifles, Muskets, and Shotguns |
| FG | 1.18 - 1.70 | Very Large Caliber Rifles or Shotguns |
| PPPP (4P) | 0.15 - 0.42 | same as FFFFG |
| PPP (3P) | 0.35 - 0.80 | same as FFFG |
| PP (2P) | 0.67 - 1.12 | same as FFG |
| P | 0.85 - 1.25 | same as FG |
Table of Black Powder Grades (Grain size ranges may vary slightly between different manufacturers.)
*Common black powder grades do not have a single grain size but a more or less broad grain size distribution. This is due to the manufacturing process in which the crude powder obtained by crushing the press cake gets separated according to grain size classes by passing it through a cascade of sieves with decreasing mesh size. Making a powder with a single grain size would be totally uneconomical due to a very low yield. When black powder is exposed to vibrations, for example during transport, the proportion of finer grains tends to accumulate at the bottom of the container. Dust formed by abrasion tends to settle at the bottom as well. Therefore, the powder should be homogenized by gently shaking or tumbling it before use in order to ensure constant burning characteristics. A fellow shooter told me that the unexpectedly heavy recoil of his saluting gun (a kind of large-caliber blunderbuss) almost knocked him off his feet after he had loaded it with the "dusty looking" powder from the bottom of an old container.
Charge weight:
There is a traditional rule to calculate the weight of a black powder charge.
For handguns, multiply the caliber (measured in inches) by fifty, and you have
the recommended weight of the charge measured in grains (7000 grains = 1 pound,
1 grain = 0.0648 g). The powder charge for a .44 cal pistol, for example, is
22 grains. For long guns, multiply the caliber by hundred. According to this rule,
a .50 cal rifle would require a charge of 50 grains. This is only a rule of
thumb, and the powder weight may vary within certain limits, according to the
intended purpose. For target shooting, a slightly smaller charge may be preferred
to improve precision and reduce recoil. I use 20 grains of 3FG or PPP powder with
my .44/.45 cal pistols or 12 grains of a powder blend (50% Swiss Powder #1 + 50%
3FG powder) with my .36 cal pistols. Hunting charges are usually bigger (up to 100%
and more) in order to increase penetration power and ensure a quick kill.
*Swiss Powder #1 has a higher burning rate than 3FG powder and may allow for a reduced dosage. I find it particularly useful in small-caliber target pistols or in pistols with very short barrels (derringers, etc.). Besides, I occasionally shoot .357 Magnum cartridges handloaded with Swiss Powder #1 (powder charge: 21 grains Swiss Powder #1, bullet: H&N .357 HPHS 127 grains, OAL: 40.5 mm, taper crimp).
European powder manufacturers recommend a charge of 100 mg black powder per mm
caliber (+ max. 400 mg) in handguns and 250 mg powder per mm caliber (+ max. 600
mg) in long guns for target shooting. If in doubt, follow the recommendations of
the gun manufacturer or the advice of experienced shooters.
I do not quite agree with the above-mentioned rules since the weight of a round
ball varies in proportion with the third power of its diameter. Using a charge
weight directly proportional to the ball diameter will therefore result in
oversized charges for small-caliber guns and undersized charges for large
calibers. In the days of Daniel Boone, hunters used to divide the ball weight by
two to get the weight of the powder charge for their long guns. Varying the
powder weight in direct proportion with the weight of the projectile seems
logical at first glance. The powder weight for a rifle firing a .445 cal round
ball, for example, would be approx. 66 grains which is ok. On the other hand, this
method would lead to absurdly heavy charges for very large calibers. A .750 cal
round ball (similar calibers are often found with old big-game rifles and smoothbore
muskets), for example, weighs approx. 634 grains (density of lead = 11.342
g/cm3) and would require 317 grains of black powder. Definitely not
recommended!
I find it more reasonable to vary the weight of the powder charge in proportion
with the cross-sectional area of the barrel bore. For this purpose, I multiply
the square of the caliber (measured in inches) by a conversion factor, f, to get
the weight of the powder charge measured in grains:
powder weight = f x caliber 2
The factor f determines the length of the powder column in the barrel. For
handguns and patched round balls, f = 80...180 gives reasonable results.
This range more or less covers everything between target loads and hunting loads
(I set f at 100 for target shooting). The following table, which is meant as a
suggestion, shows the calculated powder weights (rounded) for the most common
calibers. For long guns, the calculated values can be doubled.
| Caliber [Inches] | Powder Weight [Grains] | |
| .32 | 8...18 | |
| .36 | 10...23 | |
| .40 | 13...29 | |
| .44/.45 | 16...36 | |
| .50 | 20...45 | |
| .54 | 23...52 | |
| .58 | 27...61 | |
| .62 | 31...69 | |
| .69 | 38...86 |
Some guns, particularly large-caliber smoothbores, have rather thin-walled
barrels and should be loaded with powder charges near the lower limit of the
weight range thus calculated.
IN ANY CASE, THE MAXIMUM CHARGE WEIGHT SPECIFIED BY THE GUN MANUFACTURER
SHOULD BE OBSERVED.*
Another suggested formula and more detailed information about the internal
ballistics of muzzleloaders is
here.
*Some people say it is virtually impossible to destroy a barrel by overloading it with black powder. A well-made barrel certainly has a considerable safety margin and might tolerate a much bigger charge than specified. However, a barrel burst is a matter of probability. The latter is usually very small but it is greater than zero, and there is no doubt that the chance of a burst increases with increasing charge weight. Every material scientist knows that under excessive mechanical load, a microscopic weak spot in a solid material may turn into a hairline crack which propagates gradually with every following stress peak until finally catastrophic failure occurs. Thus, a barrel surviving a hundred thousand shots with normal powder charges may unexpectedly explode after only several hundred or thousand shots when habitually overloaded. Further, you may run into a liability problem if a bystander gets hurt by fragments of an exploding barrel as a result of an overcharged gun. Do not use more powder than required for the intended purpose. Better safe than sorry.
Loading a gun with a patched round ball:
There are unexperienced shooters who take an oversized round ball (approximately
matching the groove diameter) and hammer it down the barrel. This might be ok for
the first shot when the barrel is still clean. With the second shot,
however, the difficulties begin. Now, the bore surface is coated with soot
and ash (black powder produces a lot of that), and there is MUCH more friction
than before. The force necessary to push the ball down the barrel increases
from shot to shot as the fouling of the barrel with powder residues and
abraded lead increases. Moreover, the relatively soft lead ball gets deformed
by such a rough handling. Needless to say that accurate shots can not be
achieved in this way.
The classical solution to this problem is the patched round ball.*
A ball to be used with a patch needs to have a diameter which is slightly (!)
smaller than the bore diameter of the barrel. The optimum ball size for a gun
is usually specified by the manufacturer. If no information is available, it
has to be found by experiment. For example, if you have a .44 caliber gun, get
a series of round balls with finely staged diameters, e. g., .430",
.435", .440", .445", and .450" (commercially available sizes)
and find the biggest ball within this range which rolls down the tilted barrel bore
without getting stuck (make sure to choose exactly spherical balls without
deformations). This is the size we are going to use tentatively.
*As mentioned farther above, there are other, non-spherical types of projectiles. These are often fired from rifles, hunting pistols, and sometimes in cap-and-ball revolvers and do not require a patch. They are rarely used in traditional-style target pistols or duelling pistols. Therefore, I will not go into details here.
In addition to the ball, we need a patch, a round or square-shaped piece of tear-resistant,
tightly woven cotton fabric which is placed across the muzzle before putting the ball on
top of it and ramming both down the barrel. In this way, the patch envelopes the rear
half of the ball and forms a barrier between the surfaces of ball and barrel bore. The
patch has four functions: it wipes the bore clean during loading, it prevents barrel
leading (no lead-to-steel contact), it works as a gas seal (although an imperfect one)
by filling the grooves, and it engages the rifling and thus transfers the torque which
sets the ball into rotation. Shortly after exiting the muzzle, the patch opens like a
parachute and separates from the ball. Technically, the patched round ball can be considered
as a primitive form of the saboted bullet.
The diameter of the patch is usually about 2.5 times the caliber. Like the ball size,
the optimum patch thickness is specified by the gun manufacturer in most cases. As a rule
of thumb, the thickness of the patch should not be smaller than the depth of the grooves
in order to provide a satisfactory gas seal.
groove depth = (groove diameter − bore diameter) / 2
To achieve maximum precision, it may be necessary to experiment with slightly different
combinations of ball size and patch thickness. In any case, the fit of the patched ball
in the barrel has to be reasonably tight. When we decrease the ball size, we have to
increase the patch thickness accordingly and vice versa. If the fit is too loose, the
ball may wobble about the barrel axis and/or disengage from the rifling during the shot,
and precision will suffer. Further, the muzzle velocity will be reduced due to pressure
loss. If the fit is too tight, however, the patch may tear when forcing the ball into the
muzzle. Patches may also get damaged if the crown, the front end of the rifling, has sharp
edges. To avoid this, the crown is usually provided with a conical recess.*
* The crown is an important part of any rifled barrel and should be machined as precisely as possible. Any asymmetry of the crown which may be caused by poor manufacturing quality, improper tools, or by repeated use of a steel ramrod without rod guide (abrasion!) will influence the point of impact and precision of the gun.
Learning the characteristics of a new gun and finding the best combination of ball, patch,
and powder charge for it may require some time. During this phase, patches should be inspected
after each shooting session (see below). They are usually found a few yards down range. If the
patch shows holes or cuts caused by forced loading, try a slightly smaller ball.
It should not go unnoticed that smoothbores, too, benefit from patched round balls. Precision
is much better than with the traditionally used loose ball which was usually secured with a
wad on top of it to prevent it from rolling out of the barrel. Further, penetration power is
improved because there is less blow-by gas than with a loose ball.
Patch lubricant (important!):
The patch has to be impregnated with a suitable lubricant in order to clean the bore and
reduce friction during the loading process. Do not use machine oil or grease for this
purpose because it will not soften and dissolve black powder residues from a preceding shot
satisfactorily. Apart from a small proportion of soot, these residues consist of water-soluble
potassium salts (carbonate, sulfate, thiosulfate, thiocyanate, sulfide, etc.). If the abrasive
salt particles are not broken down and dissolved quickly, they will cause increased barrel
wear. Therefore, the lubricant should contain a high proportion of water. There are a number
of patch lubricants based on oil-in-water emulsions on the market. They are overpriced in my
opinion. I have obtained excellent results with an aqueous solution of oil soap. The latter
is a pasty soap made by saponifying vegetable oil with aqueous potash lye. My own method for
making oil soap is described here.
Oil soap is also commercially available, often in diluted, liquid form. If necessary,
you can add deionized water to obtain the desired consistency. Do not use hair shampoo,
shower gel, dishwashing detergents, or similar products as a patch lubricant. These
formulations may lubricate well but they often contain sodium chloride (table salt)
which is highly corrosive to steel. Other products contain sulfates which are corrosive as
well. Solid hand soap, too, may contain salt residues from the manufacturing process.
Check the list of ingredients for chlorides and sulfates before using a product
(phosphates are usually ok). Before using a commercial oil soap with unknown composition,
dissolve 10-20% of it in deionized water, immerse a piece of mild or carbon steel in the
solution, and wait a couple of hours or days. If the steel sample shows rust stains or
signs of pitting afterwards, don't use the product. An improved corrosion test is described
here.
After dipping the patch in the lubricant, excessive liquid should be removed with a sponge,
cloth, paper tissue, or something similar. Otherwise, the powder will absorb too much
moisture and burn slower. I usually dip the necessary number of patches at the beginning of
a shooting session and keep them on a sheet of paper towel which absorbs the excess of
lubricant. Even after one hour, they are usually still moist enough to be used.*
In extremely dry climates, however, the water portion might evaporate faster. If you do
everything correctly, no powder residues will accumulate on the bore surface, and you can
fire an almost unlimited number of shots in succession without swabbing the barrel in between.
If you intend to carry the loaded gun for some time without shooting it, e. g., during a hunt,
you should consider putting a wad or a caliber-sized felt plug on top of the powder charge
before loading patch and ball. This will keep the patch lubricant from migrating into the
powder charge for a while. It may also slightly increase the muzzle velocity by reducing
the proportion of blow-by gas.
*Rifles may require dripping wet patches because the latter have to wipe a longer length of barrel bore and pick up more powder residues. It may even be useful to choose a thicker patch in combination with a slightly smaller ball because a thicker patch can hold more lubricant. If this does not help, the barrel should be swabbed with a moistened cleaning patch between shots.
The following six pictures illustrate the first steps of loading a gun with a patched round ball. The muzzle shown here belongs to my .45 cal Great Plains Rifle:
|
1. |

|
Muzzle with Crown |
|
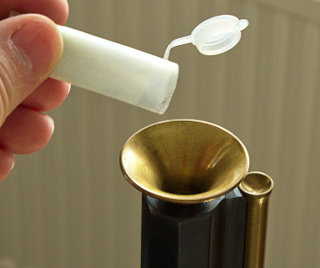
2. |
|
Muzzle with Powder Funnel Inserted* |
|
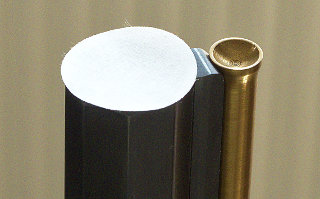
3. |
|
Muzzle with Patch |
|
4. |
|
Patch and Ball on Top of Muzzle |
|
5. |
|
Patch and Ball Partially Inserted into Muzzle |
|
6. |
|
Patch and Ball Inside the Muzzle |
*Many target shooters (including myself) prefer to use a powder funnel with a long tube reaching almost down to the breech plug of the barrel. This prevents the powder from adhering to the bore surface and mixing with powder residues from the preceding shot. Of course, this is not practicable when hunting with muzzleloaders.
I use my thumb to press patch and ball as far into the crown as I can (Picture 5). If the patch is not properly centered, I can pull it out again and correct its position. Next, I use a rubber hammer to drive the ball completely into the muzzle.* The rubber is soft enough to avoid deformation of the lead ball. When the ball sits flush with the front of the muzzle (Picture 6), I take a starter (a very short ramrod) and push the ball a few centimeters farther into the barrel. After that, I take the long ramrod and push the ball all the way down the bore until it is firmly seated against the powder charge. Never leave an air gap between ball and powder charge! This might result in irregular burning of the powder and a very high peak pressure. Barrel bulges and even bursts caused by "short-started" balls have been reported. A proposed explanation is here.
*If you can push patch and ball all the way into the muzzle with your thumb alone, the fit is probably not tight enough and the ball will not engage the rifling sufficiently. Try a slightly bigger ball or a thicker patch.
On the other hand, forcibly hammering the ball against the powder charge brings no advantages but crushes the powder grains (resulting in different burning characteristics) and deforms the ball. If the ramrod is equipped with a knob- or ball-shaped handle, one can achieve a constant seating depth by sliding a suitable spacer over the ramrod. I have modified a ramrod by inserting a metal tube and a stack of washers between handle and rod guide. By adding or removing washers, I can make sure the ball touches the powder charge without compressing it too much.
|
Modified Ramrod
Metal ramrods, particularly those made of steel, should be equipped with a rod guide (a plastic or soft-metal sleeve) to protect the muzzle from abrasion. The tip of a ramrod is often made of brass or aluminium. The front side of the ramrod tip should have a concave or conical depression to avoid any flattening of the ball. For wooden ramrods, I make tips of .357 Magnum or .38 Special cartridge cases by drilling a conical recess into the base (see picture). The rim of these cases has a diameter of approx. 11 mm which is ideal for .44 or .45 cal barrels. Some guns are equipped with a removable ramrod attached to the barrel. If a separate ramrod is used, it should have a ball- or knob-shaped handle because this facilitates loading.
|
Home-Made Ramrod Tip
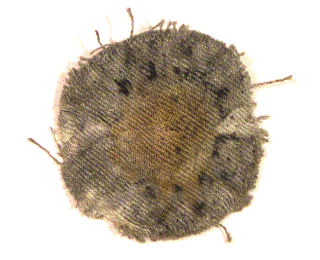
The following photo illustrates how a cotton patch (powder side) recovered after shooting looks if everything has been done right. It is virtually intact, without holes or tears. The brownish tint in the middle region results from the intense heat the fabric has been exposed to for a few milliseconds. Around the brownish zone is a ring of small black spots. This is material partially charred by hot blow-by gas which cannot be avoided entirely since a patch is not a perfect gas seal. There is only little (harmless) charring because the patch had been impregnated with a water-based lubricant (water has a high heat of evaporation and thus cools the patch). The grayish discoloration in the outer area of the patch mainly results from soot wiped off from the bore surface during the loading process. This patch has been washed after shooting to make the different zones more distinguishable.
|
Used Patch
One should make a habit of inspecting patches after shooting since a damaged patch
may not be able to guide the ball through the barrel with sufficient precision. I
once experienced a much greater scatter of hits after replacing my standard charge
of 20 grains 3FG powder with 16 grains of the very fast-burning Swiss Powder #1
in a .45 cal caplock pistol. When I examined the spent patches after the shooting
session, I found most of them torn to pieces. Obviously, the patches were not
able to withstand the higher peak pressure. Even with a .36 cal pistol, I observed
torn patches occasionally when using Swiss Powder #1. Therefore, I'm using a 1:1
blend of SP #1 and 3FG powder for this caliber now.
Always point the gun in a safe direction during and after loading. The next thing
to do is pulling the hammer (cock) of the gun back until the first click is heard
(half-cock position). In this position, the trigger is locked, and the gun cannot
go off accidentally (in theory at least). Now you can put a percussion cap on the
nipple. When you are ready to shoot, point the gun towards the target, pull the
hammer back until you hear the second click (full-cock position), take aim carefully,
and slowly (!) pull the trigger until the gun fires. If, for some reason, you change
your mind and decide to shoot later, remove the percussion cap first, pull the
trigger while holding the hammer back with your thumb, and lower the hammer carefully
until it rests on the nipple. Don't forget, the barrel is still loaded!
|

|
|
Hammer in Half-Cock Position |
Hammer in Full-Cock Position |
Shooting results:
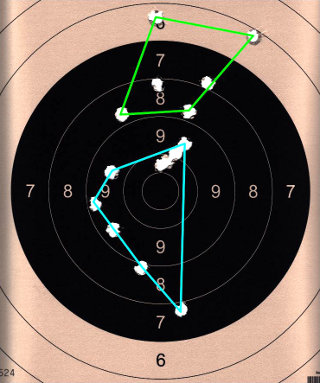
The next photo shows a sample of shooting results I obtained with a .45 cal duelling
pistol. There are two groups of hits on the target. The first one (green) was obtained
by aiming at the center, the second one (cyan) by aiming at the lower edge of the black
area (six o'clock position). The pistol was shot one-handed over a distance of 25 m
(no benchrest). The diameter of the target (black area) is 20 cm (8 in). I am not even
a particularly good shooter. Some of my fellow shooters would hit a tennis ball under
these conditions. This should be proof enough that muzzleloaders are accurate weapons
if properly loaded. Actually, I obtain about the same dispersion with my muzzleloader
pistols as with my S&W 686 revolver.
|
Target
Well, this is how to shoot a percussion gun with round balls. As you can see, it
is a time-consuming procedure requiring discipline, care, and patience. Muzzleloader
shooting is definitely nothing for Rambo-type people who want action. It is rather a
relaxing, meditative sport like archery. You should not mind a little smoke, stink,
and dirty fingers, however. Since there are so many variables involved, the
science-minded shooter finds plenty of room for experiments.
Cleaning the gun after shooting:
After returning from the shooting range, you should clean the gun as soon as
possible since black powder residues are corrosive to steel. The only barrel
cleaner that really works here is water. Unfortunately, water (tap water as well
as distilled or deionized water) is also corrosive to mild steel and carbon steel.
Every time you pour water down a barrel, a thin rust film builds up quickly which
gets removed afterwards when swabbing the barrel (a brownish discoloration of the
cleaning patch indicates rust)*. Repeat this hundreds of times, and you will
observe a measurable loss of material. Therefore, adding a corrosion inhibitor to
the water is highly recommended. To reduce corrosive wear during cleaning, I add
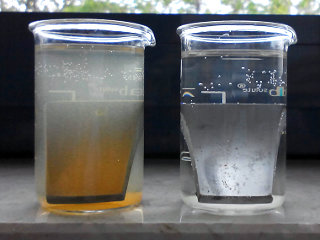
a little ammonia solution to the water. The following photos demonstrate how ammonia
can delay rust formation. I exposed two identical pieces of mild steel to tap water at
room temperature for five hours. The left beaker shows how ordinary tap water corrodes
steel. The tap water in the right beaker contains 0.025% ammonia. Apart from a few
tiny spots, the steel sample is still rust-free.
* I was once shocked to find the bore of my black-powder shotgun coated with a thin, orange-colored layer of rust only minutes after rinsing it with hot tap water. This motivated me to look for suitable corrosion inhibitors.
|
Corrosion Test
The concentration of ammonia in the cleaning solution required to retard corrosion may vary, depending on water quality. To clean the barrel, I remove it from the stock, unscrew the nipple, and immerse barrel and nipple in this diluted ammonia solution for approx. 5 minutes, scrubbing the bore with a nylon brush and the outside of barrel and nipple with an old toothbrush to remove adhering powder residues. If necessary, I clean the interior of the nipple with a wire and a pipe cleaner. Then I take the barrel out of the bath, flush the bore a few times with ammonia solution, and rub the outside of the barrel dry with a cotton rag. Apart from diluted ammonia solutions, I experimented with other home-made bore cleaners. These are described here. To prevent rust formation during storage, particularly under humid conditions, I finally rinse bore and nipple with a solution of approx. 0.1% sodium benzoate in ethanol (ethyl alcohol, >90%)*. Sodium benzoate is a widely used food preservative. Less well known is the fact that it is also an effective flash rust inhibitor.
* Dissolving sodium benzoate in ethanol is a slow process which may take a couple of hours or days, depending on temperature and particle size. Fine powder dissolves faster than granulate.
At the end of the cleaning procedure, I apply a small quantity of
oil soap paste
to the threads of the nipple before screwing it back in again.
Ammonium benzoate is another flash rust inhibitor. It can be easily prepared in
situ by reacting benzoic acid (food preservative) with ammonia in ethanol. Here
is a formulation for a ready-to-use rust-inhibiting solution:
| Ethanol (>90%) | 1000 ml | |
| Benzoic acid | 2.0 g | |
| Ammonia solution (25%) | 1.2 g |
Preparation: dissolve benzoic acid in ethanol first, then add ammonia solution
while stirring. Finished! The solution is flammable. Keep in mind that ammonia
is caustic and can damage eyes and skin.
Although I never apply any oil to the bore of my muzzleloader barrels, I haven't
found even a trace of rust in them up to now. The advantage of keeping bore and
ignition channel oil-free during storage is that there will be no "oil shot".
Further, misfires are extremely rare. I only rub the outside of a barrel with a
small quantity of penetrating oil after cleaning it. I further clean the hammer
and the outside of the lock plate with diluted ammonia solution, check the internal
parts of the lock for any dirt and apply a few drops of hypoid gear oil to the
friction surfaces if necessary. Gear oil contains extreme-pressure and anti-wear
additives which reduce friction and abrasive wear to a great extent. By the way,
I also use gear oil to lubricate the friction surfaces (but not the bore!) of my
SIG Sauer P-226 pistol. Recently, I tried one of the newer lubricants containing
ceramic nano particles and was quite impressed with the performance. I will continue
testing it.
In addition, I clean the stock, particularly the area around the lock, with a
damp cloth. From time to time, I rub the stock with teak oil in order to prevent
the wood from getting dull.
Other sources of corrosion:
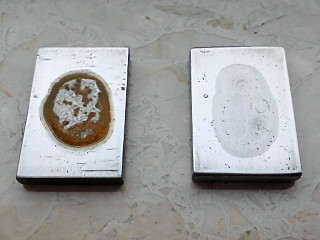
I have repeatedly heard and even read that shooters use their spit to lubricate
patches. The following picture shows two pieces of mild steel I treated with a
few drops of saliva and my
soap-based lubricant,
respectively. The left steel sample (saliva) showed severe corrosion after only two hours
while the right sample (diluted oil soap) remained unaffected. Even after
several months, the right sample did not show any signs of rust. It is often said that
patched balls cause more barrel wear than Minie balls and other projectiles used without
a patch do. After my experiments, I tend to believe this is rather caused by corrosive wear
which occurs when using unsuitable patch lubricants. Saliva contains inorganic salts,
among them highly corrosive chlorides. Imagine what happens when you load your gun with
a saliva-lubricated patch and ball. Within a short time after loading, a thin, almost
invisible rust layer will form on the bore surface. As soon as you shoot the gun, the
rust will be rubbed off by the patch and blown out of the barrel. The same thing happens
shot after shot. Guess how the inside of your barrel will look after, say, ten thousand
shots. The surface may actually look like polished but the dimensions will have changed
as a result of gradual material ablation! Corrosion tests are very easy to perform, and
they tell you a lot about the suitability of patch lubricants or bore cleaners.
|
Corrosion Test
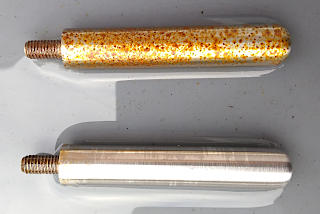
Here is an example of what can be achieved with a corrosion inhibitor. Two identical mild-steel cylinders (similar to those used for the ASTM D665 corrosion test) were polished with fine sand paper and afterwards degreased with acetone. Then, one of the test specimens was dipped in a 0.1% solution of sebacic acid (1,10-decanedioic acid) in acetone. After evaporation of the solvent, both cylinders were put on a plastic table and exposed to foggy and rainy weather for two days. The photo showing both specimens on the wet table surface at the end of the test speaks for itself:
|
Another Corrosion Test
When you treat your black-powder gun like recommended above, you can shoot it for decades.
Some of my guns are fifty years old, and they look and shoot like new ones.
Misfires:
Percussion guns are usually very reliable but misfires do happen occasionally.
The most frequent causes are obstructions in the ignition channel (dirt, grease,
oil) and forgotten powder. The latter sounds absurd but it happens more often
than one might be inclined to think. In most of these cases, the shooter has been
distracted by people talking to him while he was loading the gun. The most important
rule in case of a misfire: keep calm, don't fidget with your gun, and wait about one
minute while still pointing the gun in a safe direction (in case it is a hangfire).
Safety first! Next, unscrew the nipple and check if the ignition channel is free
of powder residues or other debris. If necessary, clean it with a needle or a
piece of wire. Inspect the barrel bore with a suitable lamp. A small LED flashlight
is ok for handguns if you don't have a barrel lamp.* If you can see a ball in the
barrel, put some powder into the nipple hole, screw the nipple back in, put a
new cap on the nipple, and fire the gun. A small quantity of powder (I use
about 3 grains of priming powder) is usually enough to drive the ball out of the
barrel (and hurt people!). Check again if the barrel is free. Repeat the
procedure if necessary. If you cannot remove the ball this way, there is a
special tool, the ball puller. It looks like a wood screw with a very sharp tip
and has to be attached to the ramrod. One has to hammer it into the lead ball
and screw it tight before pulling the ball out of the barrel. I don't like it
particularly since I found that often several attempts are necessary to pull the
ball out. Besides, I am always afraid of damaging the rifling with it.
Therefore, I prefer the "powder method". There are also tools based on
compressed air or CO2, but I never tried one of these.
*It can be helpful to have a ramrod with depth markings indicating an empty barrel as well as a barrel loaded with a standard charge and ball.
Here is something about flintlocks.
And here is something about accurate powder measurement.
Will be continued...